
Connecting PayPal to Systeme.io is one of those things that sounds more complicated than it actually is. But if you’ve ever stared at your dashboard wondering where to paste the API keys or what a webhook even is, I’ve been there too.
In my six years of helping online business owners set up their payment systems, I’ve seen a lot of confusion around this exact topic. So I put together a guide that strips away all the unnecessary jargon. By the end, you’ll have PayPal fully integrated and ready to accept payments.
What You Need Before You Start
Before we jump into the steps, let’s make sure you have everything ready. This will save you from running into errors midway.
A Systeme.io account. If you don’t have one yet, you can sign up for a free plan to start.
A PayPal Business account. This is a must. You cannot use a personal PayPal account to accept payments through Systeme.io. The good news is that upgrading your existing personal account to a Business account is completely free.
Your PayPal login credentials (email and password). If you have two-factor authentication enabled, keep your phone nearby because you’ll need to enter a verification code.
That’s it. No coding skills, no technical background, and no complicated setup.
Step-by-Step Guide to Connect PayPal to Systeme.io
The actual connection process takes less than five minutes. I’ve done this for multiple clients, and the steps are always the same.
1. Access Your Payment Gateway Settings
Log into your Systeme.io account. Look at the top right corner of your dashboard and click on your profile picture. A dropdown menu will appear. Click on Settings.
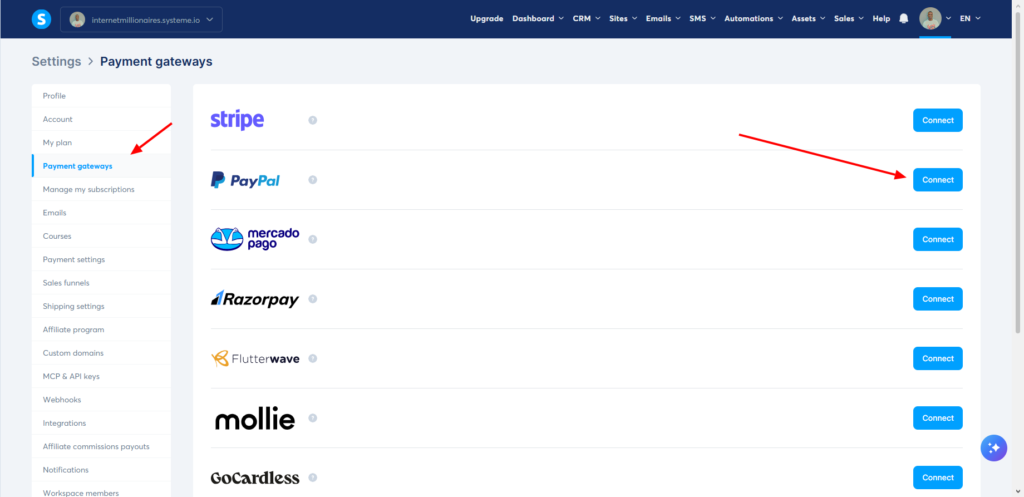
Once you’re in the Settings area, look at the menu on the left side of your screen. Find and click on Payment gateways.
2. Connect Your PayPal Account
You will see a list of available payment gateways. Find the PayPal option and click the Connect button right next to it.
A new tab or popup window will open, asking you to log into your PayPal account. Go ahead and enter your PayPal email address and password.
If you have two-factor authentication enabled on your PayPal account, you will receive a security code via text message or email. Enter that code to verify your identity.
3. Authorize the Connection
After you log in, PayPal will show you a permission screen. This screen is asking for your approval to allow Systeme.io to connect to your PayPal account. Click the Allow button to grant permission.
Once you click Allow, PayPal will confirm that the connection has been successfully set up. You will see a message saying the connection is ready. Click on Return to Systeme.io to go back to your dashboard.
4. Verify the Integration
The system may take a few seconds to complete the setup. Once it’s done, you will see your PayPal Merchant ID appear in the Payment gateways section of your Systeme.io settings. This means your PayPal account is now fully integrated and ready to process payments.
Configuring Instant Payment Notifications (IPN)
This is the part that many people miss, and it’s surprisingly important. IPN stands for Instant Payment Notifications. Think of it as a messenger that tells Systeme.io every time a payment happens in your PayPal account.
Without IPN properly configured, Systeme.io might not automatically update when someone buys something from you. This could mean your customer gets access to their purchase late, or not at all. Here is how to set it up correctly.
Log into your PayPal account. Click on your profile icon at the top right, then click on Account settings.
Scroll down until you see Notifications. Click on it, then click Update in the Instant payment notification section.
Click on Choose IPN settings. In the Notification URL field, enter this exact address: https://systeme.io/payment/webhook/listening-paypal.
For the IPN Messages field, select Receive IPN messages (Enabled). Click Save to save your changes.
PayPal will show a confirmation window letting you know that payment notifications have been activated successfully.
Making Sure Your Order Forms Work
Here is something that tripped me up the first time I did this. Even after connecting PayPal, your order forms might not work properly if they are missing certain fields.
For PayPal to process payments through Systeme.io, every order form you create must include three specific fields: email, first name, and last name.
If any of these fields are missing from an order form, the payment will fail. So before you send any customers to a checkout page, double-check that all three fields are present. This is a small detail, but it makes all the difference.
Common Errors and How to Fix Them
Even with clear steps, things can sometimes go wrong. Here are the most common issues I have seen and how to resolve them.
PayPal keys are incorrect. This error usually appears when there is a mismatch between your PayPal account and Systemeio. Double-check that you are using a PayPal Business account, not a personal one.
Account is restricted. If you see an error message saying Account is restricted, this means your PayPal account has some kind of limitation on it. This often happens when PayPal is still verifying your identity or when there is an issue with your account standing. The best course of action is to contact PayPal support directly and ask them to help you resolve the restriction.
Order form fields missing. If customers try to pay but get an error, check your order form. Make sure the email, first name, and last name fields are all present.
PayPal connection not showing. If you completed the steps but do not see your PayPal Merchant ID, try disconnecting and reconnecting. Sometimes a simple refresh does the trick.
Why the Email Field Is Required
I want to take a moment to explain why the email field is mandatory on your order forms. It is not just a random requirement.
PayPal uses the customer’s email address as a unique identifier for the transaction. When someone pays you through PayPal, that email address helps link the payment to the correct order in Systeme.io. Without it, the system cannot properly match the payment to the customer.
This is why every order form that processes PayPal payments must include an email field. It is not optional. It is how the two systems talk to each other.
Using PayPal for Affiliate Payouts
If you run an affiliate program inside Systeme.io, PayPal can also help you pay your affiliates automatically. This is a feature I have used for several clients, and it saves a massive amount of time.
Once you have more than 25 affiliate invoices pending payment, Systeme.io allows you to connect your PayPal account to enable automatic payouts. To set this up, go to your profile picture, click Settings, then click Affiliate program in the left menu. At the top right of the page, click Connect your PayPal account.
This feature alone can turn what used to be hours of manual payment work into something that happens automatically.
Important Considerations Before Choosing PayPal
I have worked with both PayPal and Stripe extensively over the years. Each has its strengths and weaknesses.
PayPal is a household name. Many customers trust it because they have used it for years. This can actually increase conversion rates because people feel safe checking out with a brand they recognize. PayPal is also available in most countries and supports over 25 currencies, making it a solid choice for international sales.
However, there are some trade-offs to be aware of. PayPal charges higher transaction fees compared to Stripe. For one-time transactions within the US, PayPal charges 3.49 percent plus a fixed fee of 49 cents, while Stripe charges 2.9 percent plus 30 cents.
On a thousand-dollar sale, that difference adds up to about 10 dollars. If you process a high volume of payments, those fees can eat into your profits significantly.
Another thing to consider is flexibility. Stripe is generally considered more developer-friendly and offers more customization options for your checkout experience. PayPal’s setup is simpler for non-technical users, but that simplicity comes at the cost of flexibility.
So which one should you choose? If your customers are mostly in countries where PayPal is widely trusted and you do not mind the higher fees, PayPal is a great choice.
If you want lower fees and more control over the checkout experience, Stripe might be better for you. Many of my clients actually use both, giving their customers a choice at checkout.
Testing Your Setup
Before you start sending customers to your checkout pages, test everything. I learned this lesson the hard way early in my career.
Create a test product in Systeme.io with a very low price, like one dollar. Go through the checkout process yourself using a different PayPal account or a family member’s account. Complete the payment and make sure that:
- The payment shows up in your PayPal account
- Systeme.io records the order correctly
- The customer receives any automated emails or product access
This five-minute test can save you from embarrassing situations where customers try to buy something and the payment fails.
Frequently Asked Questions
Do I need a PayPal Business account, or can I use a personal account?
You need a PayPal Business account. Personal accounts cannot be used to accept payments through Systeme.io. Upgrading is free and takes just a few minutes.
What happens if I do not configure IPN?
Without IPN configured, Systeme.io will not receive automatic updates about payment statuses. This can cause delays in delivering products or granting access to your customers.
Can I use both PayPal and Stripe at the same time?
Yes. Systeme.io allows you to connect multiple payment gateways. You can offer both PayPal and Stripe as options at checkout.
How long does the integration take?
The entire process, including IPN configuration, takes less than 10 minutes if you have everything ready.
What should I do if I get a restricted account error?
Contact PayPal support directly. They are the only ones who can resolve account restrictions. Once they clear the restriction, try connecting again.
Putting It All Together
Integrating PayPal with Systeme.io is not complicated, but the small details matter. A missing email field on an order form, an IPN setting that was never turned on, or a personal account instead of a business account, these little things can break the entire system.
Take your time with each step. Test everything before going live. And remember that giving your customers a payment method they already know and trust can make a real difference in how many sales you actually close.
The beauty of using Systeme.io is that once this integration is set up, you barely have to think about it again. Payments come in, customers get access to their purchases, and you can focus on actually growing your business instead of babysitting your payment system.
Now I would love to hear from you. Have you run into any specific issues while trying to connect PayPal to Systeme.io? What part of the process felt the most confusing to you? Drop your experience in the comments.