

Adding a payment method in Systeme.io is one of those small steps that makes a huge difference. You can have the best product in the world, but if people can’t pay for it easily, you won’t make a single sale.
I learned this the hard way early in my entrepreneurial journey. I was using a complicated setup where customers had to jump through hoops just to check out.
My conversion rates were terrible, and I kept losing people right at the finish line.
Then I discovered Systeme.io and everything changed. Their payment system just works. No coding, no crazy technical skills required.
In this guide, I’ll show you exactly how to add a payment method in Systeme.io for your products. I have over 6 years of hands-on experience helping entrepreneurs set up their online businesses, and I’ve personally done this hundreds of times.
Let’s get you set up properly so you can start collecting payments today.
What You Need Before Adding a Payment Method
Before jumping into the setup process, make sure you have everything ready. This will save you from getting stuck halfway through.
Here is what you will need:
- An active Systeme.io account – If you don’t have one yet, sign up first. They have a free plan that works great for getting started.
- A Stripe account – If you plan to accept credit or debit cards. Stripe is free to set up and widely used.
- A PayPal account – This is another popular option. Many customers prefer paying with PayPal.
- Your sales funnel or product ready – You need somewhere to attach the payment page to.
One thing to keep in mind – Systeme.io does not process payments directly. Instead, it connects to payment processors like Stripe and PayPal. Think of Systeme.io as the storefront and Stripe or PayPal as the cash register.
How do I Add a Payment Method in Systeme.io?
I will walk you through the entire process. Follow these steps carefully, and you will have your payment system live in no time.
1. Log Into Your Systeme.io Account
Go to the Systeme.io website and log in with your email and password. Once you are in, you will land on your dashboard.
This is your main control center where you can manage everything – funnels, emails, products, and of course, payments.
2. Access the Payment Gateways Section
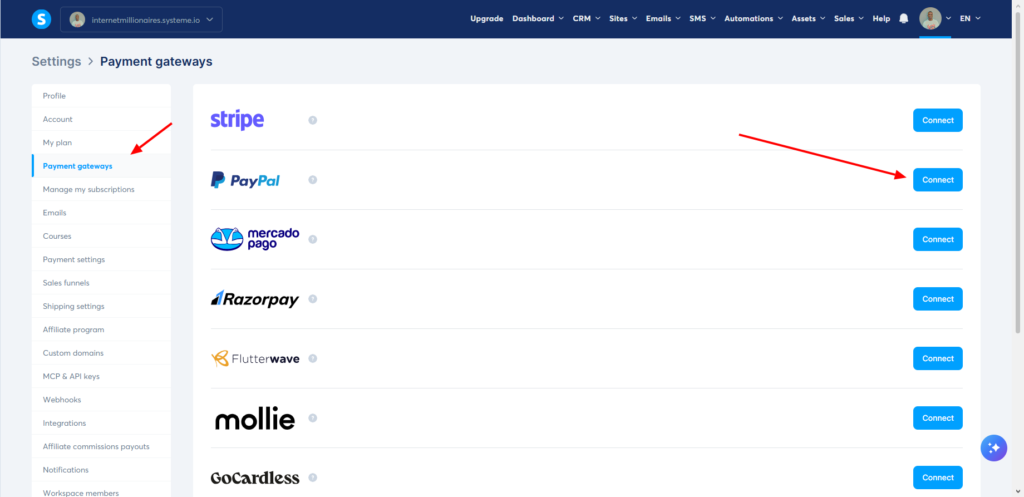
Look at the left sidebar on your dashboard. You will see several options.
Click on Settings. It looks like a gear icon.
Once the settings page opens, look for Payment gateways in the menu. Click on that.
This is where all the magic happens. You will see a list of all the payment processors Systeme.io can connect to.
3. Choose Your Payment Gateway
Systeme.io supports many payment gateways. Here are the most popular ones:
- Stripe – Best for credit and debit card payments. Works great for subscriptions and one-time payments.
- PayPal – Very popular. Many customers trust PayPal.
- Mercado Pago – Great for customers in Latin America.
- Razorpay – Perfect for Indian customers.
- Flutterwave – Works well for African markets.
- Mollie – Popular in Europe.
- GoCardless – Good for recurring bank debit payments.
- Paystack – Another great option for African businesses.
There is also a Cash on delivery option, but that only works for physical products.
For this guide, I will focus on Stripe and PayPal since they are the most common choices.
4. Connect Stripe to Systeme.io
If you want to accept credit and debit cards, Stripe is the way to go.
Click the Connect button next to Stripe.
A popup window will appear asking you to log into your Stripe account. Enter your Stripe email and password.
Once you log in, Stripe will ask for permission to connect to your Systeme.io account. Click Allow or Connect.
That is it. Your Stripe account is now linked.
If you do not have a Stripe account yet, the popup will guide you through creating one. It only takes a few minutes.
5. Connect PayPal to Systeme.io
PayPal is just as easy to set up.
Click the Connect button next to PayPal.
You will be asked to log into your PayPal account. Enter your PayPal email and password.
After logging in, PayPal will ask you to grant permission to Systeme.io. Click Agree or Allow.
Your PayPal account is now connected.
Pro tip: I always recommend connecting both Stripe and PayPal. Some customers prefer using credit cards, while others feel safer with PayPal. Giving people choices increases your chances of making the sale.
6. Activate the Payment Methods on Your Funnel
Connecting your payment gateways is only half the battle. You also need to turn them on for each sales funnel.
Go to Sales funnels in your dashboard.
Click on the funnel where you want to accept payments.
Look for Funnel settings. Click on it.
You will see checkboxes for different payment options. Check Credit card or debit card (this uses Stripe). Check PayPal if you want to offer that too.
If you set up Cash on delivery, you will see that option here as well.
Click Save to confirm your changes.
7. Create an Order Form or Payment Page
Now that your payment methods are connected, you need a page where customers can actually complete their purchase.
Go to your sales funnel and click Add step in the funnel pages menu on the left.
A popup will appear. From the Type dropdown list, select Order form.
Choose a template that looks good to you. You can start from scratch or pick one of the pre-designed templates.
Click Save to create your page.
Once the page is created, you will see the configuration page. Here you need to specify what you are selling.
Scroll down to Choose offer type. Select either digital product or physical product.
If you are selling a digital product like a course or ebook, select which resource customers will get access to after payment. Options include courses, course bundles, tags, communities, or calendar events.
If you are selling a physical product, select the product from the resource dropdown list. Just keep in mind that Systeme.io does not handle shipping or fulfillment for physical products. You will need to manage that part yourself.
You can also add one or more pricing plans to your payment page. For example, you might offer a one-time payment option and a monthly subscription option.
Click Edit page if you want to customize the look and feel of your payment page. You can change colors, add images, edit text, and make it match your brand.
8. Test Your Payment System
Before you start sending customers to your payment page, test everything to make sure it works.
Go to your live payment page and try to make a small test purchase. Use the test mode in Stripe or PayPal if they offer it. This lets you go through the entire checkout process without actually moving real money.
Make sure the payment goes through properly. Check that customers get redirected to the right thank you page. Verify that they receive access to whatever product they purchased.
I once skipped this testing step and ended up with a broken checkout page for three days. Do not make the same mistake I did. Test everything first.
Payment Gateway Settings You Should Know About
Once your payment methods are connected, there are a few settings worth understanding.
API Keys and Webhooks
When you connect Stripe or PayPal, Systeme.io automatically handles most of the technical stuff. But sometimes you might need to manually enter API keys.
API keys are like special passwords that let Systeme.io talk to your payment processor. You can find these in your Stripe or PayPal account under Developer settings.
Webhooks are another technical feature. They allow Systeme.io to receive instant notifications when someone makes a payment. This is important for automatically delivering digital products after purchase.
The good news is that Systeme.io usually sets these up automatically when you connect your account. You rarely need to touch them.
Multiple Currencies
If you sell to customers in different countries, you might want to accept multiple currencies.
Stripe supports over 135 currencies. PayPal supports about 25 currencies.
To accept different currencies, you need to enable them in your Stripe or PayPal account settings. Systeme.io will then show prices in the customer‘s local currency based on their location.
This is a nice touch that can boost your international sales.
Subscription and Recurring Payments
If you sell memberships or subscription products, make sure your payment processor supports recurring payments.
Both Stripe and PayPal support subscriptions. When you set up a price plan in Systeme.io, you can choose between one-time payment, weekly, monthly, or yearly recurring payments.
Systeme.io handles the entire subscription lifecycle. It charges customers automatically each month, sends payment reminders, and even handles failed payments.
Common Problems and How to Fix Them
Even with a simple system like Systeme.io, things can sometimes go wrong. Here are some issues I have run into and how to solve them.
The Connect Button Does Nothing
Sometimes you click Connect but nothing happens. This is usually a browser issue.
Try these fixes:
- Clear your browser cache and cookies
- Try a different browser like Chrome or Firefox
- Disable any ad blockers or privacy extensions
- Make sure popups are not blocked
Payment Method Not Showing on Checkout
You connected Stripe and PayPal, but customers only see one option.
Go back to your funnel settings and make sure both checkboxes are ticked. It is easy to forget this step.
Also check that your payment gateway is still connected. Sometimes connections expire or get disconnected.
Customers Say Payment Failed
This could be a few different things.
First, ask the customer to check their card details. A simple typo in the card number or expiration date will cause a failure.
If the card details are correct, the issue might be on Stripe or PayPal‘s end. Log into your payment processor account and check if there are any warnings or restrictions.
Sometimes the customer’s bank blocks the transaction. This is out of your control. All you can do is ask them to try a different card or use PayPal.
Subscriptions Not Renewing Automatically
If you sell subscription products and notice that some customers are not getting charged automatically, check a few things.
Make sure your Stripe or PayPal account is still active and in good standing. Log into your account and look for any notifications about account restrictions.
Also check that your customers have valid payment methods on file. If a customer‘s card expires and they don’t update it, the renewal will fail.
Systeme.io will try to charge the customer again after a few days. But after multiple failures, the subscription will be cancelled automatically.
FAQs About Adding Payment Methods in Systeme.io
Can I add multiple payment methods to my Systeme.io account?
Yes, absolutely. You can connect Stripe, PayPal, and several other gateways all at the same time. Your customers will see all available options on the checkout page. I recommend connecting at least two different payment methods to give customers choices.
Does Systeme.io charge transaction fees?
Systeme.io does not add any extra transaction fees on top of what Stripe or PayPal charge. You only pay the standard fees from your payment processor. This is one reason I like Systeme.io – they do not try to take an extra cut of your sales.
How long does it take to set up a payment method?
The actual connection takes about two to three minutes per gateway. Setting up your order form and testing everything might take another ten to fifteen minutes. You can have a fully functional payment system running in under thirty minutes.
What information do I need to connect Stripe?
You need your Stripe account email and password. That is it. Systeme.io handles the rest. If you want to manually configure API keys, you can do that too, but it is not required for basic setup.
What information do I need to connect PayPal?
Similar to Stripe, you just need your PayPal account email and password. The connection process walks you through granting permission to Systeme.io.
Can I accept cash on delivery?
Yes, but only for physical products. You cannot offer cash on delivery for digital products like ebooks or online courses. The cash on delivery option is available in the payment gateways list, and you can enable it for individual funnels.
Is my customers’ payment information secure?
Yes. Systeme.io does not store any credit card information on its servers. All payment data goes directly to Stripe or PayPal, which are both fully compliant with PCI security standards. Your customers‘ information stays safe.
What happens if a customer wants a refund?
You process refunds through your payment processor, not through Systeme.io. Log into Stripe or PayPal, find the transaction, and issue the refund from there. Systeme.io will automatically update the customer’s access to your product once the refund is processed.
Final Thoughts
Adding a payment method in Systeme.io is not complicated. The platform was designed to make this process as simple as possible, and with good reason. If setting up payments feels like a headache, you will never get around to actually selling your products.
I have helped countless entrepreneurs work through this exact process. The ones who succeed are the ones who take action instead of overthinking. You have everything you need right now to get your payment system live.
The steps are straightforward:
- Log into your account
- Go to Settings then Payment gateways
- Connect Stripe or PayPal
- Enable payments in your funnel settings
- Create your order form
- Test everything before going live
That is really all there is to it.
Now I am curious about your experience. Have you started setting up your Systeme.io account yet, or are you still in the planning phase? What products are you thinking of selling? Drop a comment below and let me know. I read every response and I am happy to help if you get stuck anywhere in the process.