

If you’ve been trying to figure out how to create a course on Systeme.io without losing your mind, you’re in the right place.
I remember staring at my screen six years ago, overwhelmed by complicated course platforms that cost a fortune and took weeks to figure out. Then I found Systeme.io, and everything changed.
Today, I’m going to walk you through exactly how to build and launch your first course using Systeme.io. No fluff. No confusing tech talk. Just a clear path from blank page to live course.
Let me show you what actually works.
Why Systeme.io Makes Sense for Course Creators
Before we jump into the how, let me tell you why I recommend Systeme.io to almost everyone I work with.
Most course platforms charge you a monthly fee plus a percentage of every sale. Then they charge you extra for email marketing, funnels, and affiliate management. It adds up fast.
Systeme.io bundles everything together. You get course hosting, email marketing, sales funnels, payments, and affiliate management in one place. And the free plan lets you start without spending a dime.
I’ve tested nearly every course platform out there. For beginners and even intermediate creators, Systeme.io gives you the best bang for your buck.
1. Get Your Foundation Ready
Let me save you some headaches right now.
Start With the Free Plan
Don’t pay for anything yet. Systeme.io’s free plan lets you create one course with up to five members. That’s plenty to test your idea and get your first sales.
Upgrade only when you outgrow it. I made the mistake of upgrading too early on my first course. Don’t be me.
Map Out Your Course Structure First
Here’s where most people mess up.
They open Systeme.io and start adding lessons without a clear plan. Then they end up with a messy course that’s hard to follow.
Open a simple document or notebook and answer these three questions:
- What specific problem does my course solve?
- What’s the one result someone gets after finishing?
- What are the 5-7 main steps to get that result?
Those main steps become your modules. Inside each module, break down the smaller lessons.
For example, if you’re teaching someone how to start a blog:
Module 1: Setup
- Lesson 1: Choose your platform
- Lesson 2: Pick a domain name
- Lesson 3: Set up hosting
See how that works? Keep it simple.
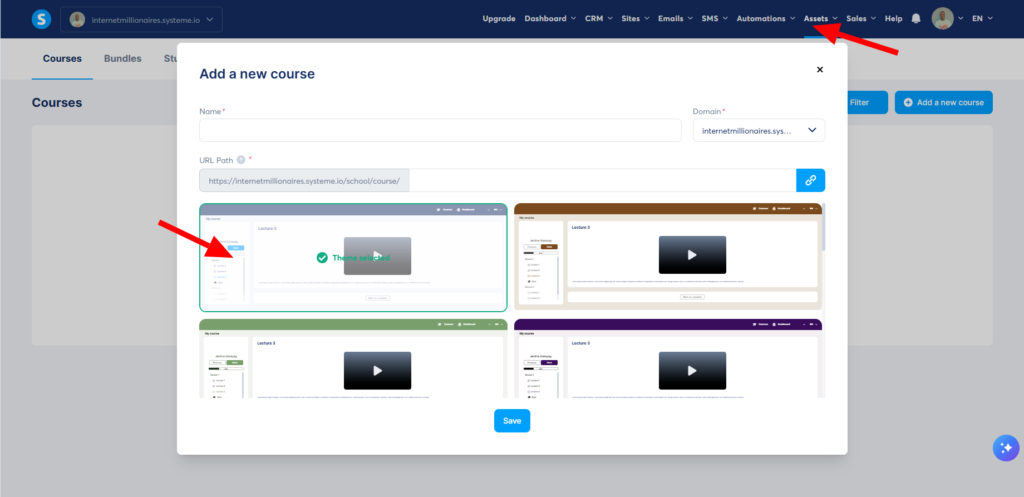
2. Create Your Course in Systeme.io
Now for the hands-on part. I’ll guide you through every click.
Access the Course Builder
Log into your Systeme.io dashboard. On the left sidebar, click “Courses.” Then click the green “Create your course” button.
Name your course something clear and benefit-driven. Instead of “Blogging 101,” try “Start a Money-Making Blog in 7 Days.”
Add Your Modules and Lessons
Think of modules as chapters and lessons as pages within those chapters.
Click “Add module” and give it a name. Then click “Add lesson” inside that module.
You have three lesson types to choose from:
- Video – Upload your video file or paste a YouTube or Vimeo link
- Text – Write directly in the editor for written lessons
- File – Upload PDFs, worksheets, or other downloads
Pro tip: Mix it up. Videos are great for demonstrations. Text works well for checklists and summaries. Files give people something to download and keep.
Organize for Easy Navigation
Drag and drop your lessons to reorder them. Keep the flow logical. Each lesson should build on the last one.
I always add a “Getting Started” lesson at the beginning to explain how to navigate the course. It sounds small, but it saves you from confused students emailing you later.
3. Add Your Content
This is where most people get stuck. They overthink everything and never actually add the content.
Here’s my advice: done is better than perfect.
For Video Lessons
You don’t need fancy equipment. I recorded my first course using my laptop’s webcam and a $20 microphone.
Just make sure you:
- Record in a quiet room
- Speak clearly
- Keep videos under 15 minutes when possible
- Show your screen when explaining software or steps
Upload your video file directly to Systeme.io, or host on YouTube unlisted and paste the link. Either works fine.
For Written Lessons
Keep paragraphs short. Use bullet points. Add bold text for key ideas.
People skim online. Make your written lessons easy to scan.
Write like you talk. If you wouldn’t say “utilize” in a conversation, don’t type it. Say “use” instead.
Add Worksheets and Resources
This is what separates good courses from great ones.
A simple PDF checklist or worksheet gives students something to print and follow along with. It also makes your course feel more valuable.
Upload these as file lessons. Place them right after the lesson where they’re needed.
4. Set Up Pricing and Access
Now let’s make sure people can actually buy your course.
Choose Your Pricing Model
Systeme.io gives you three options:
One-time payment – Customer pays once and gets lifetime access. This is the simplest option for beginners.
Recurring subscription – Customer pays monthly or yearly. Good for ongoing training or communities.
Free – No payment required. Great for lead magnets or mini-courses.
I recommend starting with a one-time payment between $47 and $197 for your first course. Price it based on the result, not the hours you spent making it.
Create a Sales Page
Inside your course settings, click “Sales page.” Systeme.io gives you a simple drag-and-drop builder.
Your sales page needs four things:
- A clear headline about the result
- What students will learn (bullet points work great)
- A bit about you and why you’re qualified
- A price and buy button
Keep it simple. Don’t overcomplicate the design. A clean, readable page always beats a fancy, confusing one.
Set Up Payment Processing
Connect Stripe or PayPal to accept payments. Both are free to set up and take a small percentage of each sale.
Go to Settings > Payment gateways and follow the connection steps. It takes about five minutes.
5. Test Everything Before Launch
I learned this lesson the hard way.
I launched my first course without testing the checkout process. Turns out, I broke something and nobody could buy for three days. Embarrassing.
Run through this checklist before you tell anyone about your course:
- Buy your own course (use a test payment or refund yourself afterward)
- Go through every single lesson as a student would
- Check that videos play and files download
- Confirm you receive the new student notification email
- Test on both computer and phone
Fix anything that feels clunky. Your students will thank you.
6. Launch Your Course
Launch day. Don’t overcomplicate this either.
Start With People Who Already Trust You
Email your list first. If you don’t have a list yet, start with your social media followers, friends, and past clients.
Offer a launch discount for the first week. Something like 20-30% off creates urgency without feeling scammy.
Use Systeme.io’s Email Features
Create a simple email sequence inside Systeme.io:
- Email 1 (launch day): Announce the course, share the discount
- Email 2 (day 2): Answer a common question or share a testimonial
- Email 3 (day 4): Remind them the discount ends soon
- Email 4 (last day): Final reminder
Keep emails short and helpful. Don’t just say “buy my course.” Explain how it solves their problem.
Add an Affiliate Program
Once you have your first sales, turn on Systeme.io’s affiliate feature. Let students earn a commission for referring others.
Start with a 30-40% commission. It’s generous enough to motivate people but leaves you plenty of profit.
What Happens After Launch
Your course is live. Now what?
Most people stop here and wonder why nobody buys.
Keep Improving
Watch which lessons students quit on. If everyone stops at lesson 4, that lesson needs work.
Ask your first few students for feedback. What confused them? What would they add?
Update your course based on real feedback. This is how you go from a good course to a great one.
Keep Promoting
One launch announcement isn’t enough. Promote your course regularly through:
- Your email newsletter
- Social media posts
- Your blog or YouTube channel
- Free workshops or webinars
I promote my courses every few months. Each time, I reach new people who missed it the first time.
Build a Community
Systeme.io has basic community features. Use them.
Create a space where students can ask questions and help each other. This reduces the support burden on you and makes students more likely to finish.
FAQ
Do I need a website to create a course on Systeme.io?
No. Systeme.io hosts everything for you. Your course gets its own URL that you can share anywhere.
Can I migrate my existing course to Systeme.io?
Yes. You’ll need to manually re-upload your lessons, but the process is straightforward. I’ve moved courses from Teachable and Kajabi without issue.
What file types does Systeme.io support for lessons?
Videos (MP4, MOV), images, PDFs, Word docs, and text files. For video, you can also embed YouTube or Vimeo links.
Does Systeme.io take a transaction fee?
No. You only pay Stripe or PayPal’s standard processing fees (about 2.9% + $0.30 per transaction).
How much can I earn selling courses on Systeme.io?
That depends entirely on your audience and pricing. I know creators making a few hundred dollars a month and others making six figures. Start with the goal of 10 sales, then grow from there.
Ready to Stop Planning and Start Creating?
Here’s what I want you to do right now.
Open Systeme.io. Click “Courses.” Create that course you’ve been thinking about for months.
Add just one module and one lesson today. That’s it. Little progress beats big plans every single time.
I’ve watched hundreds of students and clients go through this process. The ones who succeed aren’t the smartest or most talented. They’re the ones who actually start.
So what’s stopping you from adding that first lesson today?
Drop a comment below and let me know what course you’re planning to create. I read every response, and I’d love to cheer you on.