

Have you ever felt like you are pouring money into Facebook ads but not seeing the return you hoped for? I have been there. After over six years of helping entrepreneurs and business owners build sustainable online income, I can tell you the difference between a campaign that bleeds cash and one that prints money often comes down to one small piece of code: the Facebook Pixel.
Without the Pixel, your ads are essentially shouting into the void. You have no idea who visited your website, what they looked at, or how to get them back. With the Pixel, everything changes. You can build audiences, track conversions, and most importantly, run retargeting campaigns that bring back people who already showed interest.
In this guide, I will show you exactly how to add the Facebook Pixel to Systeme.io, step by step. No coding experience is needed. By the end, you will be ready to launch retargeting campaigns that actually work.
What is the Facebook Pixel and Why Should You Care?
Let me explain this simply. The Facebook Pixel (now officially called the Meta Pixel) is a small piece of code you place on your website. Think of it as a silent observer. It watches what visitors do on your site and reports that information back to Facebook.
That is it. But here is why that matters so much.
First, the Pixel tracks conversions. It tells you when someone who clicked your ad actually takes a meaningful action on your site. Maybe they sign up for your newsletter, register for a webinar, or buy your product. Without the Pixel, you are just guessing which ads work. With it, you know exactly what is driving results.
Second, it optimizes ad delivery. Once Facebook understands what a conversion looks like for you, its algorithm can find more people like that to show your ads to. This lowers your cost per result over time.
Third, and most relevant for this guide, the Pixel enables retargeting. Have you ever visited a website, left, and then started seeing that company’s ads everywhere you go on social media?
That is the Pixel at work. It allows you to create Custom Audiences of people who visited your Systeme.io pages but did not convert. You can then run highly targeted ads specifically to that warm audience.
Finally, the Pixel helps you build Lookalike Audiences. You can ask Facebook to take an audience of your best customers and build a new, much larger audience of users who share similar characteristics. This is one of the most effective ways to find new customers at scale.
Simply put, not installing the Facebook Pixel is like driving with your eyes closed. You might be moving, but you have no idea where you are going. Installing it gives you the map and the GPS you need to succeed.
How do I Add a Facebook Pixel to Systeme.io for Retargeting Campaigns?
Before we jump into the technical steps, make sure you have these things ready.
A Facebook Business account. This is different from your personal Facebook account. You can set one up for free if you do not have one yet.
A Facebook Ads account. You will need this to run campaigns. It is connected to your Business account.
A Systeme.io account. Obviously. And make sure you have a custom domain connected to your Systeme.io account. The Pixel setup process requires domain verification, and that only works with a custom domain. Using a free subdomain like yourname.systeme.io will cause problems later.
Finally, administrator access to your Facebook Business Manager. If someone else manages your ads, you may need them to help with this part.
1. Create Your Facebook Pixel
If you already have a Pixel set up in your Facebook Business account, you can skip to Step 2. But if you are starting fresh, here is how to create one.
Go to your Facebook Business Settings. Click on Settings, then under Data sources, click on Data sets and Pixels.
Click the Add button. A popup will appear where you can name your Pixel. Choose something clear and memorable, like MyBusinessPixel. Click Create.
Another popup will appear saying your Pixel is not ready to use yet. Do not worry about this. Close the popup for now.
Now you need to assign people and assets to your Pixel. Click Assign people, select your business account from the popup, give yourself Full control by clicking the slider, then click Assign.
Next, click Connect assets. In the popup that appears, check your ad account, then click Add.
Your Pixel is now created and ready to be installed on your website.
2. Get Your Pixel Code
Now you need to grab the actual code that will go into Systeme.io.
Go to your Facebook Events Manager. You can find this under All tools in your Business account.
Click on your Pixel from the list. Then click Set up Meta Pixel.
You will see two options: Conversions API or Meta Pixel. For now, select the Meta Pixel option and click Connect.
Next, click on Install Code Manually below the Manually add Pixel code to website option. Facebook will generate a block of code for you.
You do not need to understand what all that code means. Just copy the entire code snippet. Keep it somewhere handy, like a simple text document, because you will paste it into Systeme.io in the next step.
3. Add the Pixel to Systeme.io
Here is where the real work happens. Systeme.io gives you two ways to add your Pixel code. I will explain both so you can choose the one that works best for you.
Option A: Add Pixel Code to a Single Page
If you only want to track a specific landing page or opt-in page, this method is for you.
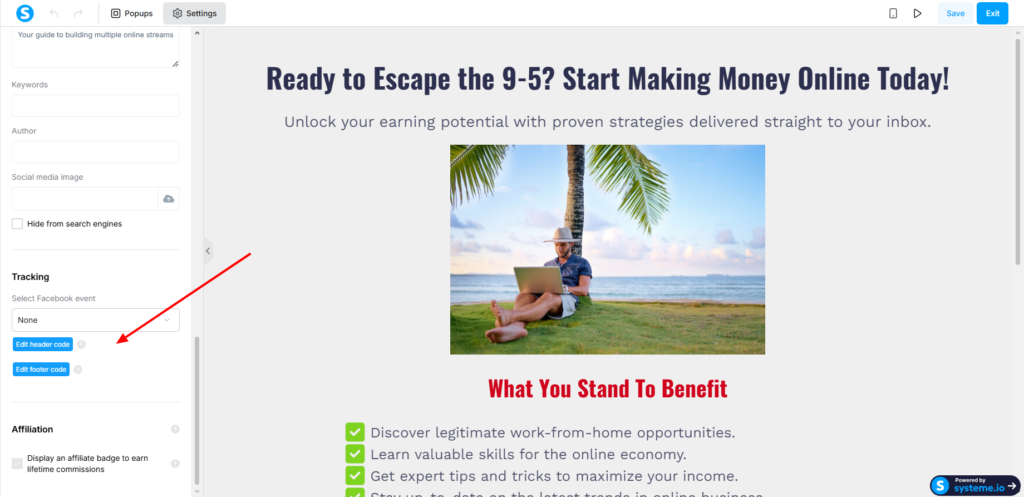
Go to the editor of the page you want to track. Click on Settings on the left side of the editor.
Find the tracking section and look for the Edit header code box. Paste your Facebook Pixel code into that box.
Click Save at the top right of your editor to save the changes.
That is it. The Pixel will now fire whenever someone visits that specific page.
Option B: Add Pixel Code to Your Entire Sales Funnel
If you want the Pixel to track every page inside a sales funnel, this method is more efficient. I use this approach for almost all my projects because it saves time and ensures no pages are missed.
Click on your profile picture in the top right corner of your Systeme.io dashboard. Select Settings from the dropdown menu.
Click on Sales funnel settings. Find the Tracking code field and paste your Facebook Pixel code there.
Click Save.
Now the Pixel code will automatically be deployed across every page in every sales funnel you create. This is the easiest and most reliable method.
One important note. Whether you choose Option A or Option B, make sure your Facebook Pixel code is included on all the pages of your sales funnel. Missing even one page can break your tracking and create gaps in your retargeting audiences.
4. Verify Your Domain
This step is required before Facebook will fully trust the data coming from your website. Domain verification confirms that you actually own the domain connected to your Systeme.io account.
In your Facebook Business Manager, navigate to Brand Safety and Suitability, then click on Domains.
Click Add, enter your domain name, and click Add again. Facebook will generate a Meta tag. This is a small piece of HTML code that looks something like meta name=facebook-domain-verification.
Copy that Meta tag. Go back to Systeme.io. If you used Option B above, go to Settings, then Sales funnel settings, and paste the Meta tag below your Facebook Pixel code in the tracking code field. Make sure there is a line break between the two codes so they do not merge together.
If you used Option A, paste the Meta tag into the header code section of your page.
Once you have added the Meta tag, go back to Facebook and click Verify domain. Facebook will check that the tag exists on your website. If everything is correct, your domain will be verified.
5. Test That Your Pixel is Working
You have done all the hard work. Now let us make sure it actually works.
The easiest way to test your Pixel is to use the Meta Pixel Helper. This is a free Chrome extension created by Facebook. Install it from the Chrome Web Store.
Once installed, visit your Systeme.io website. Click on the Pixel Helper icon in your browser toolbar. If the icon turns green and shows activity, your Pixel is working correctly. If it shows errors, the extension will give you diagnostic information to help you fix the problem.
You can also test directly inside Facebook. Go to your Events Manager, click on your Pixel, and click Test Events. Enter your website URL in the field labeled Test browser events and click Open Website. Then perform the actions you want to track, like visiting a page or filling out a form. The events should appear listed under Test Events.
Set Up the Facebook Conversions API
The standard Pixel tracks events through the visitor’s browser. But what happens if someone has an ad blocker installed? Or if their browser privacy settings block tracking? In those cases, the Pixel may not fire at all.
That is where the Facebook Conversions API comes in. Instead of relying on the browser, the Conversions API sends data directly from your website’s server to Facebook. This server-to-server tracking is much more reliable and less likely to be blocked.
Systeme.io fully supports the Conversions API. The setup involves generating an access token in Facebook and then adding your Pixel ID and token to your Systeme.io custom domain settings. Once configured, the Conversions API works alongside your standard Pixel to capture data that would otherwise be missed.
I highly recommend setting this up. It takes an extra ten minutes but gives you much more accurate data for your retargeting campaigns.
How to Create Retargeting Audiences from Your Systeme.io Data
Now that your Pixel is installed and verified, it is time to put it to work. The real magic of the Pixel is in the audiences you can build from the data it collects.
Log into your Facebook Ads Manager. Go to Audiences, then click Create Audience, and select Custom Audience.
Choose Website as your source. Facebook will show you a list of events your Pixel is tracking, like PageView, ViewContent, Lead, and Purchase.
Select the event you want to base your audience on. For example, if you want to retarget people who visited your product page but did not buy, choose ViewContent and set the retention period to 30 days. Give your audience a name and click Create.
That audience will now start populating automatically as people visit your site. Once you have at least a few hundred people in the audience, you can run retargeting ads specifically to them.
Here is a pro tip I have learned from running campaigns for clients over the years. Do not retarget everyone the same way. Segment your audiences based on how far they got in your funnel.
Create separate audiences for people who only viewed a page, people who started checkout but did not complete it, and people who abandoned a cart. Each of these groups needs a different message. Someone who abandoned a cart needs a reminder and maybe a discount code. Someone who only viewed a page needs more education about your product.
Also, use exclusion rules to avoid wasting ad spend. Exclude people who already purchased from your retargeting campaigns. There is no point paying to show ads to people who already bought your product. And limit your ad frequency to between three and ten exposures per user. Too many ads will annoy people and hurt your brand.
Common Mistakes and How to Avoid Them
Over the years, I have seen the same mistakes happen again and again when people add the Facebook Pixel to Systeme.io. Here are the most common ones and how to avoid them.
Forgetting to verify the domain is the number one mistake. Without domain verification, Facebook may still collect data, but it will not trust that data fully. Your retargeting audiences will be smaller and less accurate. Do not skip this step.
Placing the Pixel code in the wrong location is another common issue. The code must go in the header section of your page, not the body or footer. Systeme.io makes this easy with the dedicated header code field, but I have seen people paste the code into random places and then wonder why it does not work.
Testing only once and assuming everything is fine is a mistake I made early in my career. Your Pixel may work today but stop working tomorrow if you change something in your funnel or if Facebook updates its requirements. Test regularly. I check my Pixel Helper extension at least once a week across all my active funnels.
Frequently Asked Questions
Do I need a custom domain to use Facebook Pixel with Systeme.io?
Yes. Domain verification is part of the setup process, and you cannot verify a free systeme.io subdomain. You need a custom domain connected to your Systeme.io account.
How long does it take for the Pixel to start collecting data?
The Pixel starts tracking immediately after you add the code to your site. However, it can take up to 24 hours for Facebook to show data in your Events Manager. Retargeting audiences also take time to build. You need at least a few hundred visitors to create a usable audience.
Can I add multiple Facebook Pixels to my Systeme.io account?
Yes. You can add multiple Pixel codes to the tracking code field. Just paste them one after another. Make sure there is a line break between each code. This is useful if you are running ads for multiple clients or testing different Pixels.
What if my Pixel shows a warning symbol in the Events Manager?
A warning symbol usually means your Pixel is installed but not firing correctly. Use the Meta Pixel Helper extension to diagnose the problem. Common causes include placing the code in the wrong location or missing domain verification.
Final Thoughts
Adding the Facebook Pixel to Systeme.io is one of those small tasks that delivers massive results. It takes maybe fifteen minutes to set up, but it changes everything about how you run ads. You stop guessing and start knowing. You stop wasting money on cold traffic and start nurturing warm leads who already know and trust you.
I have used this setup for dozens of my own campaigns and for countless clients. It works. The steps are straightforward. The tools are free. The only thing standing between you and better ad performance is taking action.
Now I want to hear from you. Have you tried setting up retargeting campaigns before? What has been your biggest challenge with getting the Facebook Pixel to work properly? Drop your questions or experiences in the comments below. I read every single one.